In this artice we will learn how to implement auth0 on DRF (Django REST Framework). Let’s get started.
Login to Auth0 and Create API app
Auth0 is providing the free tier upto 7000 users. Login in to auth0 and go to the dashboard click on apis. It will show up the screen like below.

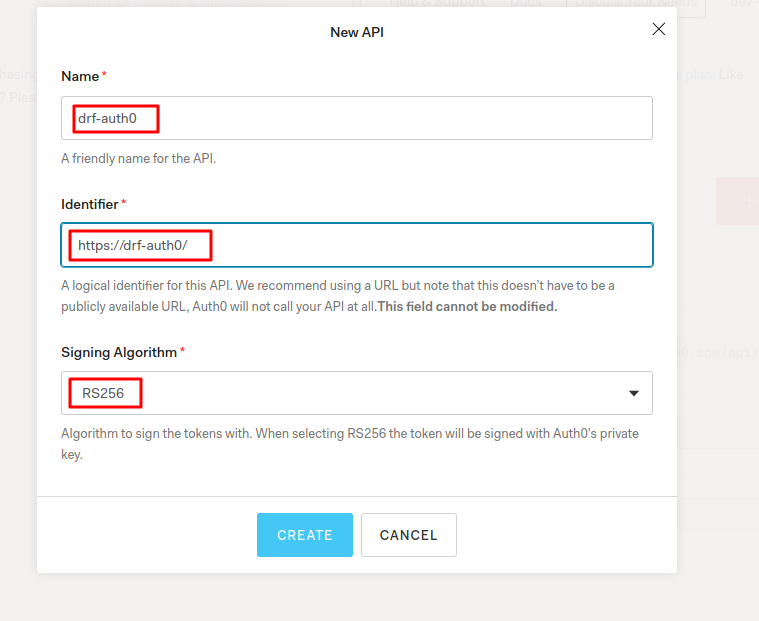
Now, click on the create api button it will bring the screen below. After that fill out the form and crete an API.

Auth0 API app configuration - Grant Types
Click on the applications in the auth0 dashboard. You will find the app drf-auth0 (Test Application).

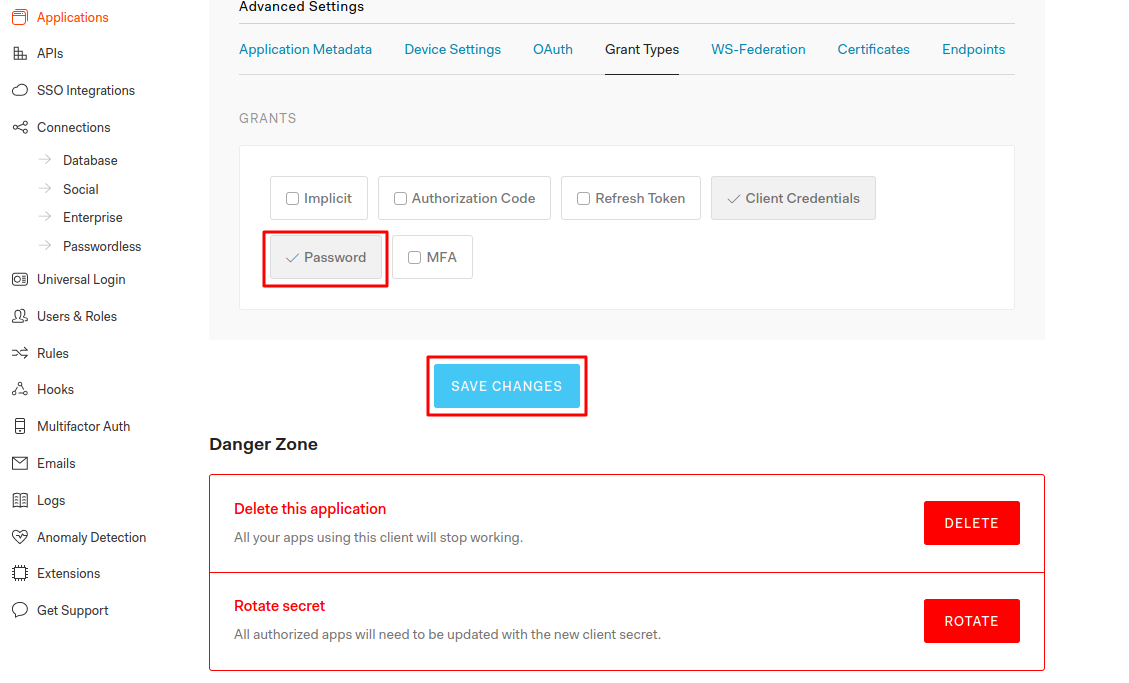
Click on the application it will show the app details like domain, client id, client secret, etc. In the bottom you can find then Show Advanced Settings link, click on it. Now, it will show us Grant Types click on that tab. It will show the options to select grant types. Allow the grant type password and save it. Otherwise we will get error when we try to get the tokens. You can allow grant types based on your requirement.

Auth0 - API Authorization Settings
We will get the jwt tokens from the endpoint /oauth/token by passing the username and password to it. If we do not set the API authorization settings then it throw the error unauthorized. Let’s go to the dashboard and configure the settings.

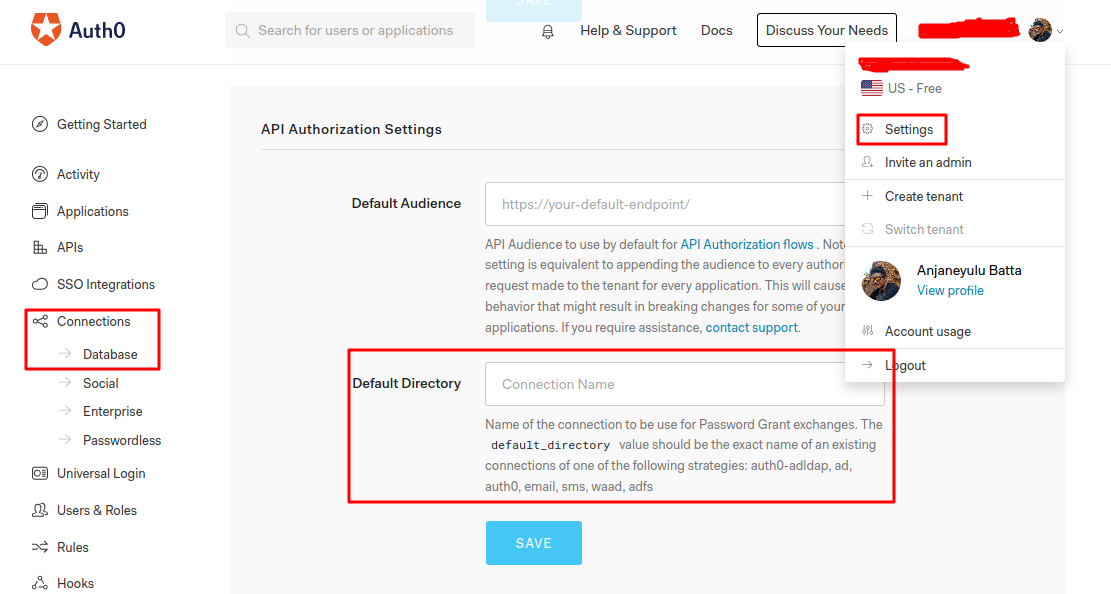
If we click on the profile dropdown it will show up the screen like above then click on the settings it will take us to the settings screen where we can find the Default Directory setting setting. We have to configure it with the Connection Name.
To get the Connection Name, just click on the Connections on left side nav menu there you can find the database link. Just click on it. Now, it will show up the available database connections. If not just create a Database Connection.
In my case the Connection name is Username-Password-Authentication. Now, go to the dashboard settings and configure the API Authorization Settings and save it.
How to get auth0 jwt tokens (access_token and id_token)
Before getting the jwt tokens, we have to create an user. To create an user click on the Users & Roles in the left side menu it will show the option to Users now, click on it and create an user with email and password.
Now, go to the drf-auth0 (Test Application) auth0 app detail page where we can find the domain, client id and client secret. We also need API Audience to get this drf-auth0 api details, there we can find the Identifier (i.e API Audience)
Let’s make a curl call to get the tokens
curl --request POST \
  --url 'https://{domain}/oauth/token' \
  --header 'content-type: application/x-www-form-urlencoded' \
  --data 'grant_type=password&username={email}&password={password}&scope=openid profile email&audience={api_identifier}&client_id={client id}&client_secret={client secret}'
In the above curl call just replace the below placeholders and make the curl call
domainemailpasswordapi_identifier[i.e api audience]client idclient secret
Now it will give us the JWT tokens. Let’s see an example json
{
  "access_token": "valid.jwt.token",
  "id_token": "valid.jwt.token",
  "scope": "openid profile email address phone",
  "expires_in": 86400,
  "token_type": "Bearer"
}
We will use the access_token to authenticate with the DRF api. Do not use id_token for the authentication of api.
implementing auth0 with DRF api
We are ready to implement the auth0 authentication ini drf apis, but we didn’t have a drf api. So, let’s create a todo rest api.
Create a python virtualenv and install the required packages.
requirements.txt
Django==3.0.6
djangorestframework==3.11.0
python-jose==3.1.0
requests==2.23.0
Create a django project with below command.
django-admin startproject drf_auth0_api && django-admin startapp todo
configure the settings
Open the drf_auth0_api/settings.py and configure it like below
# ...
INSTALLED_APPS = [
    'django.contrib.admin',
    'django.contrib.auth',
    'django.contrib.contenttypes',
    'django.contrib.sessions',
    'django.contrib.messages',
    'django.contrib.staticfiles',
    'rest_framework',
    'todo',
]
# ...

# rest framework settings
REST_FRAMEWORK = {
    'DEFAULT_AUTHENTICATION_CLASSES': [
        'auth0.authentication.Auth0TokenAuthentication',
    ]
}

# auth0 settings
AUTH0_DOMAIN = os.getenv('AUTH0_DOMAIN')
AUTH0_ALGORITHMS = ['RS256']
AUTH0_API_AUDIENCE = os.getenv('AUTH0_API_AUDIENCE')
We can get values for AUTH0_DOMAIN and AUTH0_API_AUDIENCE from auth0 dashboard. we have configured the default configuration class auth0.authentication.Auth0TokenAuthentication but we haven’t create it. Let’s do that
Open the file auth0/authentication.py and add the below code
import requests
from django.conf import settings
from django.contrib.auth import get_user_model
from jose import jwt
from rest_framework import exceptions
from rest_framework.authentication import (BaseAuthentication,
                                           get_authorization_header)

from todo.models import Auth0User

User = get_user_model()


def is_valid_auth0token(token):
    # TODO: remove request and make the `json` file as part of the project to save the request time
    resp = requests.get('https://'+settings.AUTH0_DOMAIN +
                        '/.well-known/jwks.json')
    jwks = resp.json()
    unverified_header = jwt.get_unverified_header(token)
    rsa_key = {}
    for key in jwks['keys']:
        if key['kid'] == unverified_header['kid']:
            rsa_key = {
                'kty': key['kty'],
                'kid': key['kid'],
                'use': key['use'],
                'n': key['n'],
                'e': key['e']
            }
    if rsa_key:
        try:
            payload = jwt.decode(
                token,
                rsa_key,
                algorithms=settings.AUTH0_ALGORITHMS,
                audience=settings.AUTH0_API_AUDIENCE,
                issuer='https://'+settings.AUTH0_DOMAIN+'/'
            )
            return payload, True
        except jwt.ExpiredSignatureError:
            raise exceptions.AuthenticationFailed('token is expired')
        except jwt.JWTClaimsError:
            raise exceptions.AuthenticationFailed(
                'incorrect claims, please check the audience and issuer'
            )
        except Exception as e:
            raise exceptions.AuthenticationFailed(
                'Unable to parse authentication'
            )

    return {}, False


def get_auth0_user_data(token):
    url = 'https://' + settings.AUTH0_DOMAIN + '/userinfo'
    params = {'access_token': token}
    resp = requests.get(url, params)
    data = resp.json()
    return data


class Auth0TokenAuthentication(BaseAuthentication):
    '''
    Auth0 token based authentication.
    Clients should authenticate by passing the token key in the 'Authorization'
    HTTP header, prepended with the string 'Bearer '.  For example:
        Authorization: Bearer <token data>
    '''

    keyword = 'Bearer'
    err_msg = 'Invalid token headers'

    def authenticate(self, request):
        auth = get_authorization_header(request).split()

        if not auth or auth[0].lower() != self.keyword.lower().encode():
            return None

        if len(auth) == 1:
            raise exceptions.AuthenticationFailed(self.err_msg)

        if len(auth) > 2:
            raise exceptions.AuthenticationFailed(self.err_msg)
        token = auth[1]
        return self.authenticate_credentials(token)

    def authenticate_credentials(self, token):
        payload, is_valid = is_valid_auth0token(token)
        if not is_valid:
            raise exceptions.AuthenticationFailed(self.err_msg)

        auth0_username = payload['sub'].split('|')[1]
        auth0_user = Auth0User.objects.filter(username=auth0_username).last()
        if not auth0_user:
            user_data = get_auth0_user_data(token)
            email = user_data.get('email')
            if not email:
                raise exceptions.AuthenticationFailed(self.err_msg)

            user, _ = User.objects.get_or_create(email=email)
            auth0_user = Auth0User.objects.create(
                username=auth0_username, user=user)
            auth0_user.user = user
            auth0_user.save()
        return auth0_user.user, token
We are now done with authentication part. Let’s update the todo app code.
Open the file drf_auth0_api/urls.py and update it like below.
# from django.contrib import admin
from django.urls import path, include

urlpatterns = [
    # path('admin/', admin.site.urls),
    path('', include('todo.urls'))
]
Let’s write the code for the todo app
todo/models.py
from django.contrib.auth import get_user_model
from django.db import models
from django.utils import timezone

User = get_user_model()


class Todo(models.Model):
    title = models.TextField()
    date = models.DateField(default=timezone.now())
    user = models.ForeignKey(User, on_delete=models.CASCADE)

    def __str__(self):
        return self.title


class Auth0User(models.Model):
    username = models.CharField(max_length=255)
    user = models.ForeignKey(User, on_delete=models.CASCADE)

    def __str__(self):
        return self.username
urls.py
from django.urls import path, include
from rest_framework.routers import DefaultRouter

from . import views

router = DefaultRouter()
router.register(r'todo', views.TodoViewset)

urlpatterns = [
    path('', include(router.urls)),
]
serializers.py
from rest_framework import serializers

from .models import Todo


class TodoSerializer(serializers.ModelSerializer):

    class Meta:
        fields = '__all__'
        model = Todo
views.py
from rest_framework import viewsets
from rest_framework.permissions import IsAuthenticated

from .models import Todo
from .serializers import TodoSerializer


class TodoViewset(viewsets.ModelViewSet):
    permission_classes = [IsAuthenticated]
    queryset = Todo.objects.all()
    serializer_class = TodoSerializer
Now, we are ready with the todo app. Let’s create the migrations for the app and apply it with below command
python manage.py makemigrations && python manage.py migrate
Let’s run the development server and test the endpoint localhost:8000/todo/ which will return the list of todos if available.
cURL
curl -X GET \
  http://localhost:8000/todo/ \
  -H 'authorization: Bearer <access token>'
Get the access_token and make the above curl call to authenticate with the auth0 and get the response.
Note: We have rate-limiting on auth0 APIs. So, We may get 429 status code for free tiers.
That’s it folks. You can find the complete source code at Github:drf-auth0-api
Thank you for reading the Agiliq blog. This article was written by Anjaneyulu Batta on May 8, 2020 in DRF .
You can subscribe ⚛ to our blog.
We love building amazing apps for web and mobile for our clients. If you are looking for development help, contact us today ✉.
Would you like to download 10+ free Django and Python books? Get them here
